

We cover in this guide how to set the priority of your Windows Network Adapters. But first, let us cover the basics behind the concept, the reasoning behind the solution, and possible reasons you may want to apply this particular solution.
Why would I want to prioritize the networks? For example, at some point, suppose you have a work laptop with WiFi and Ethernet network capabilities. In that case, you may need to use the WIFI for the internet while using the Ethernet connection. In addition, you may need to connect to a management port on a switch or gateway, for example, a Cisco Meraki or Palo Alto Network device.
Natively, the Windows operating system prioritizes Ethernet over WiFi as Ethernet typically is more stable and has higher bandwidth. However, this may need to be revised in the previously mentioned scenario.
You may be disconnected or have intermittent connection issues as the system prioritizes the ethernet connection over WiFi for connecting to the internet/WAN (wide area network). You can solve this by custom-configuring the network interface’s metrics.
In Windows, each network connection has a priority automatically defined by default. The primary adapter with the lowest priority network traffic has priority. Hence, when the unwanted Network Interface has a lower priority, you lose Internet access (dropped Zoom/Teams meetings, webpages do not load).
In this guide we demonstrate on a Windows 11 device, this solution slightly varies on Windows 10 vs Windows 11 how you navigate to Network Connections depending on your Windows version.

Set Windows 11 network adapter priority.
Below, you will Set the priority of network adapters on Windows 11. This will define which will be prioritized for network traffic.
1) Press on the Windows Key or Click on the Windows Logo on the bottom-left side of your screen to open the Start Menu.
2) Type Settings, then click on the Settings menu item.
3) Locate and click on Network & Internet on the left side pane.
4) Locate and open the “Advanced Network Settings” section by clicking on it.

5) Click on “More Network Adapter options” to open the Network Connection

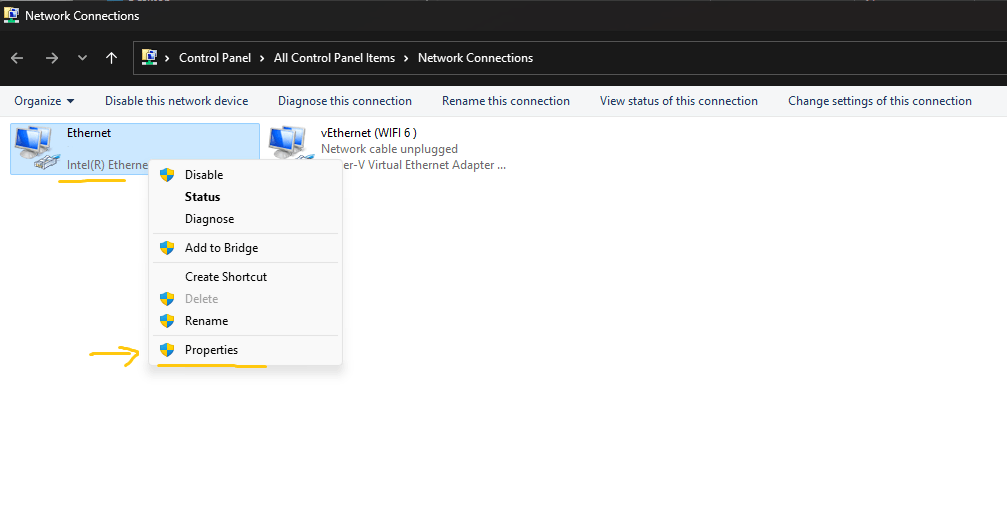
6) Right-click on the network device/interface to prioritize traffic on
7) Click the “Properties” button.
8) On the list, locate and double-click on “Internet Protocol Version 4 (TCP/IPv4)”.
9) Proceed to Click on the “Properties” below the list items.
10) Up top, you will see 2 tabs. Double-check that you have the “General” tab selected. Then, on the bottom-right of the window, you will see the “Advanced” button; proceed to click on it to open additional network adapter options.

11) Find and uncheck “Automatic metric.” This will enable you to set a custom “Interface Metric.”
12) Look for the “Interface metric” field, and type in a number like “10” or “20”. “10” is the higher priority, and “20” is the lower priority.

The priority is defined by the lowest number being the highest priority and the highest number being the lowest priority. You could configure as many adapters as you wish, in which each has its priority configured.
13) Click on the “OK” Advanced window.
14) Then click on “OK” once more on the Adapter properties window.
15) Repeat this process for the additional network connections that you want to set a priority on.
For example, USB to ethernet has a priority of 20 and WIFI a priority of 10; this ensures WAN routing priority is via WIFI.

16) Proceed to Click on “Close” to close the “Network Connections.”
That’s it! You have now Set the priority of network adapters for your Network Interfaces!
You can always roll back your settings changes by re-enabling “Automatic Metric” by opening “Network Connections,” clicking “Properties,” double-clicking on “IPV4” or “IPv6,” depending on which you configured, then opening the “Advanced” section.
In closing, if you need some assistance, you can always reach out to TECHIT SERVICES for all of your I.T. network support needs! We will assist you with I.T. Technical Support or consulting, Network Administration and I.T. management.
Call (619)764-6150 Today! One of our friendly representatives is ready to take your call!
For additional information and training, please visit Microsoft Learn.